Enhance code quality and performance with ESLint
July 25, 2023
Introduction
ESLint is a widely adopted JavaScript linter that analyzes and enforces coding rules and guidelines. ESLint empowers developers by detecting errors, promoting best practices, and enhancing code readability. This blog explores the fundamental concepts of ESLint, from installing the necessary dependencies to customizing rules, and integrating these custom rules into your host projects.
Configure ESLint on a project
To set up ESLint in your host project, install the ESLint package under
devDependencies as it is only used for development and not in production:
  npm install -D eslint
  #or
  yarn add -D eslint
Now, you need to provide the required ESLint configurations. You can generate your ESLint config file using any of the below commands:
  npx eslint --init
  #or
  yarn run eslint --init
This will prompt multiple options. You can proceed by selecting options that
suit your use case. This generates a config file called .eslintrc in the
format you selected (.json, .js, etc). Here is an example of .eslintrc.js:
module.exports = {
  root: true,
  env: {
    node: true,
    browser: true,
    es2021: true,
  },
  parserOptions: {
    ecmaVersion: 2021,
    sourceType: "module",
  },
  extends: ["eslint:recommended", "plugin:react/recommended"],
  plugins: ["react"],
  rules: {
    "no-console": "warn",
    "no-unused-vars": "error",
  },
  settings: {
    react: {
      version: "detect",
    },
  },
};
-
The
rootproperty is set to true to indicate that this is the root configuration file and should not inherit rules from parent directories. -
The
envproperty specifies the target environments where the code will run, including node, browser, and es2021 for ECMAScript 2021 features. -
In
parserOptions, we specify JavaScript options like JSX support or ECMA version. -
The
pluginsproperty specifies the ESLint plugins to be used. Let us say you are working on a React project. You want your code to follow some React best practices and React-specific rules. You can achieve this by addingeslint-plugin-react. -
The
extendsproperty includes an array of preset configurations to extend from, likeeslint:recommendedandplugin:react/recommended. -
The
settingsproperty includes additional settings for specific plugins. In this case, we set the React version todetectfor the React plugin, so that the React version is detected from ourpackage.json. -
In
rules, we specify custom rule configurations for the codebase. For instance, the ruleno-unused-varshelps identify and throw errors for unused variables in your code, whileno-consolewarns against usingconsole.log()statements in production code. All pre-existing rules are available in this documentation by ESLint. Rules have three error levels:rules: { "no-console": "warn", // Can also use 1 "no-unused-vars": 2, // Can also use "error" "no-alert": "off", // Can also use 0 }-
“error”or2: This will turn on the rule as an error. This means that ESLint will report violations of this rule as errors. Rules are typically set toerrorto enforce compliance with the rule during continuous integration testing, pre-commit checks, and pull request merging because doing so causes ESLint to exit with a non-zero exit code. -
“warn”or1: If you don’t want to enforce compliance with a rule but would still like ESLint to report the rule’s violations, set the severity towarn. This will report violations of this rule as warnings. -
“off”or0: This means the rule is turnedoffand will not be enforced. This can be useful if you want to disable a specific rule temporarily throughout your project or if you don't find a particular rule relevant to your project.
-
Custom rules
While ESLint comes bundled with a vast array of built-in rules, its true potential lies in the ability to create custom rules tailored to your project's unique requirements.
At the heart of every ESLint rule lies a well-crafted JavaScript object that defines its behavior. But, before we dive into the basic structure of a custom ESLint rule, there is something you need to get familiar with, called an AST (Abstract Syntax Tree).
Abstract Syntax Tree (AST)
AST can be thought of as an interpreter that dissects your code and represents it in a tree-like structure of interconnected nodes. An ESLint parser converts code into an abstract syntax tree that ESLint can evaluate. Consider the following JavaScript code snippet:
const sum = (x, y) => x + y;
This is how its AST looks:
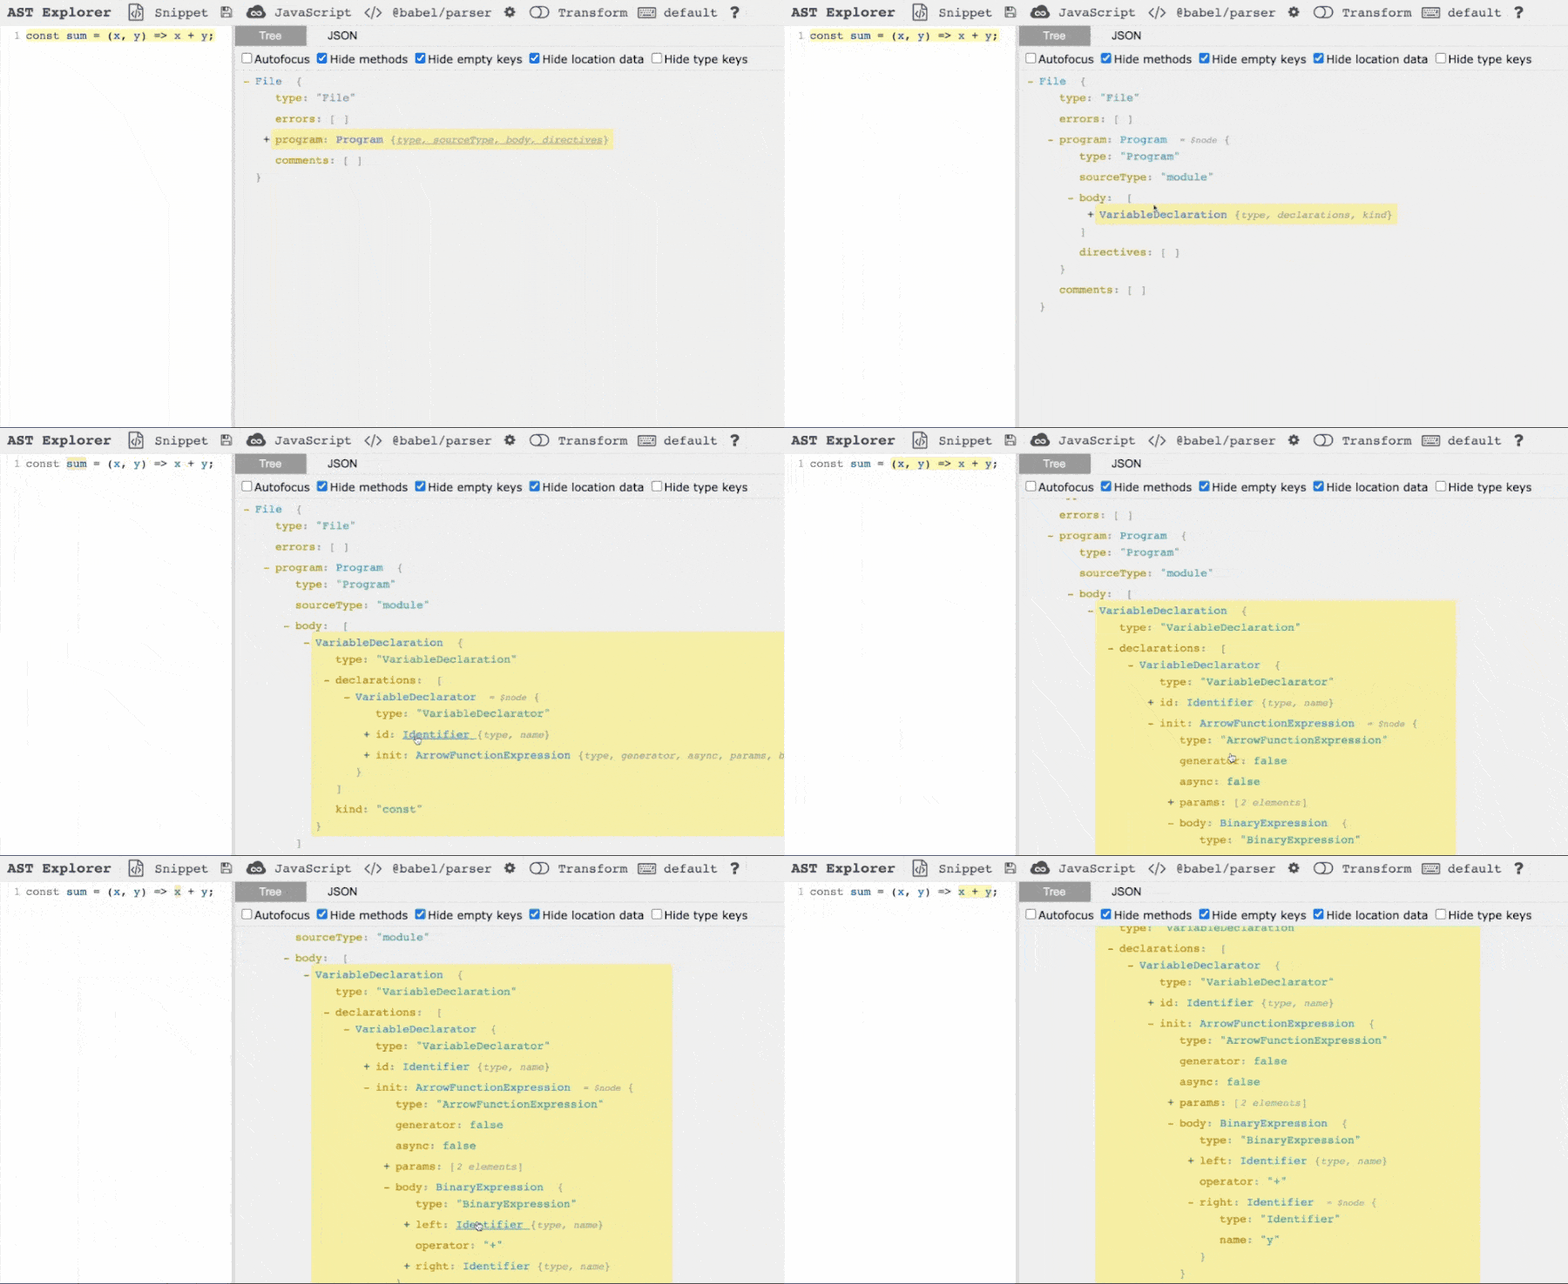
In this example, the root node is the Program node, which represents the
entire code file. Within it, there are several nested nodes,
VariableDeclarator, ArrowFunctionExpression, and so on, each dedicated to
different parts of the code. As demonstrated in the animation, when hovering
over each node, the corresponding code segment on the LHS is highlighted. To
explore and interact with both code and its AST, you can utilize the
AST Explorer tool.
Basic structure of a custom rule
Now that you know what AST is, let us learn how these trees help us in creating a custom rule. You will need to analyze the code's tree structure to find out which node is to be chosen as the visitor node. A visitor node represents the target node that is visited or traversed during the linting process.
To understand further, let us take into account a simple rule and try to build
it. Let us implement no-var rule. This rule encourages the use of let and
const keywords, instead of var keyword to declare variables. This usage
promotes block scoping and prevents any re-declarations.
The AST for a code snippet containing var would look like this:
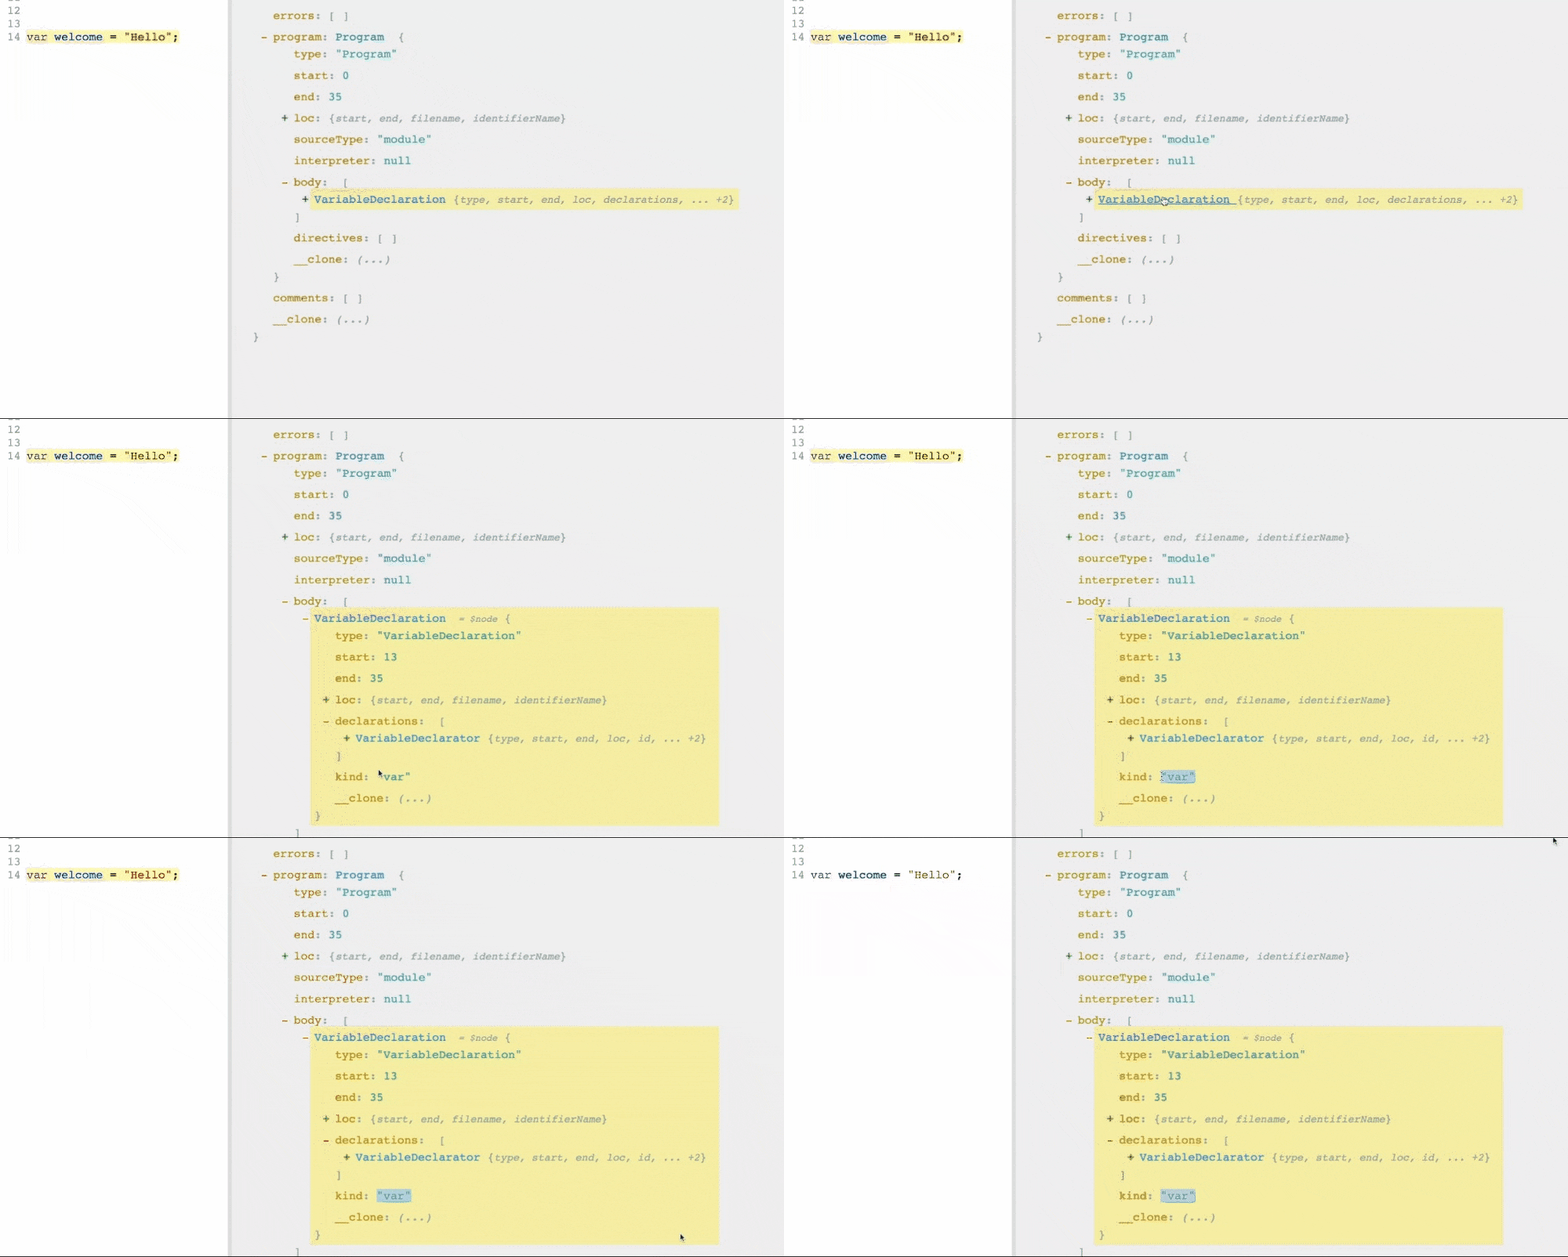
So, the node we are interested in examining is the VariableDeclaration node.
Hence, this will be our visitor node. This node contains an attribute called
kind, which contains the value var, let, or const depending on the
keyword used. All we have to do is verify whether it is a var and then throw
an error for that particular node.
We want this logic to run on all VariableDeclaration nodes:
if (node.kind === "var") {
  // raise error
}
Let us embed that logic inside an ESLint rule object:
module.exports = {
  meta: {
    type: "problem", // Can be: "problem", "suggestion" or "layout".
    docs: {
      description: "Disallow the use of var.",
      category: "Best Practices",
    },
  },
  create: context => ({
    VariableDeclaration(node) {
      if (node.kind === "var") {
        context.report({ node, message: "Using var is not allowed." });
      }
    },
  }),
};
- The
metaobject provides metadata about your rule, including its type, description, category, etc. - The
createfunction is the entry point for your rule implementation. It is called by ESLint and provides thecontextobject, which allows you to interact with the code being analyzed. - Within the create function, you can define one or more visitor methods that
target specific node types in the AST. The rule logic will be defined inside
the visitor methods. In our example, the logic needs to be run only on all
VariableDeclarationnodes. ThusVariableDeclarationis the only visitor method defined. - You can check for violations and report errors using
context.report().
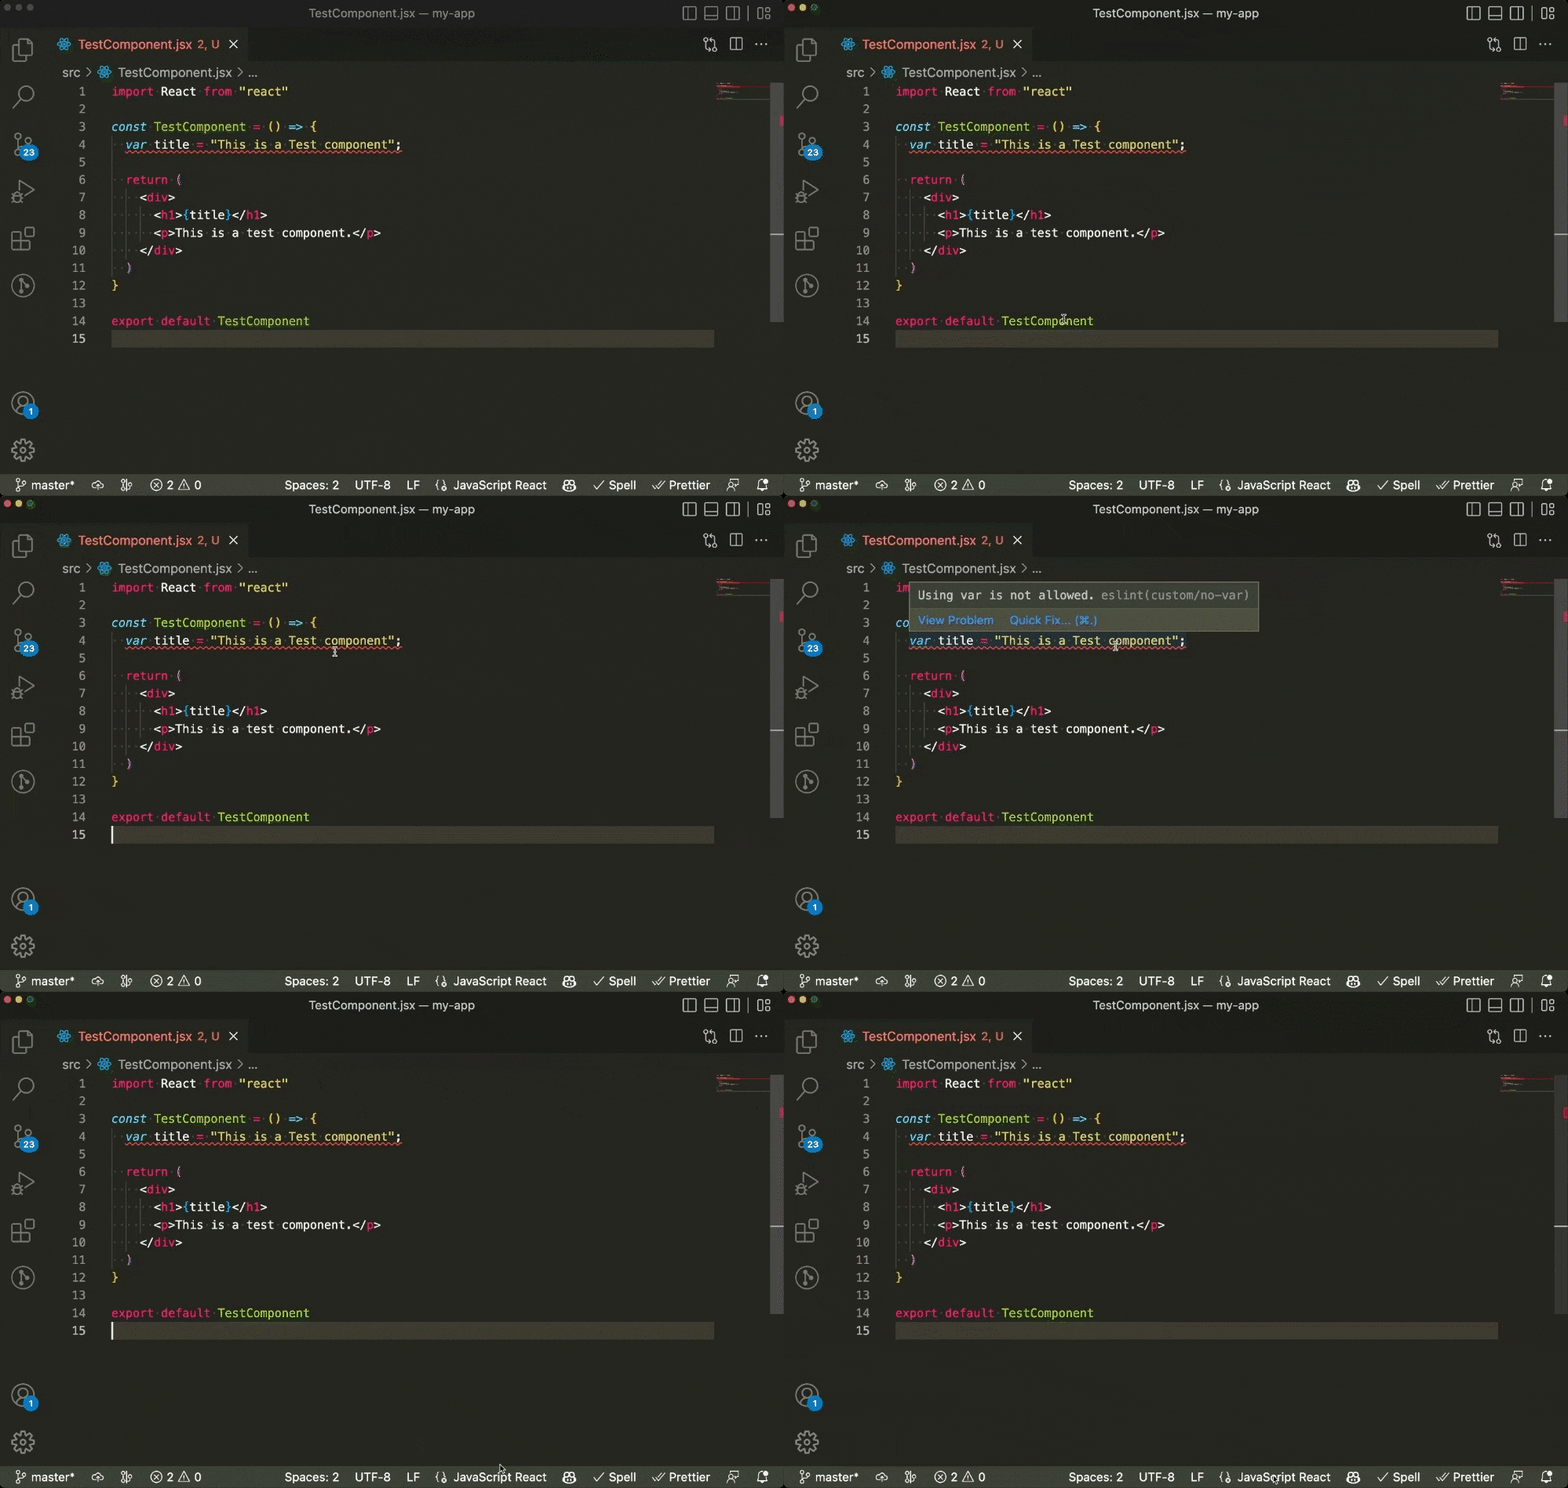
This is an example of how your rule would throw an error to that particular node, once integrated into your project:
Testing ESLint rules
Rule testing in ESLint involves verifying the behavior of custom rules by providing sample code snippets that should trigger violations (invalid cases) and code snippets that should pass without violations (valid cases). RuleTester is an ESLint utility that simplifies the process of defining and running such tests.
Configuring RuleTester
First, you need to create a RuleTester instance. You can fine-tune the parser
options, environments, and other configurations when you create the instance:
const { RuleTester } = require("eslint");

const ruleTester = new RuleTester({
  parserOptions: {
    ecmaFeatures: { jsx: true },
    ecmaVersion: 2020,
    sourceType: "module",
  },
});
Writing test cases
Now, you can use RuleTester's run() method to craft scenarios in the valid
and invalid arrays to cover all possible code variations, which will be tested
against your rule. Also, you can provide the expected error message, as the
message property in errors. Your basic test will look something like this,
for the no-var rule you implemented:
const { RuleTester } = require("eslint");

const rule = require("../rules/no-var");

const ruleTester = new RuleTester({
  parserOptions: {
    ecmaFeatures: { jsx: true },
    ecmaVersion: 2020,
    sourceType: "module",
  },
});

ruleTester.run("no-var", rule, {
  valid: ["let x = 10;", "const x = 10;"],
  invalid: [
    {
      code: "var x = 10;",
      errors: [{ message: "Using var is not allowed." }],
    },
  ],
});

console.log("Completed all tests for no-var rule");
Diving deeper into custom rule creation
Let us create another rule, that enforces the use of strict equality (===) over loose equality (==). Strict equality provides more accurate comparison results and helps prevent potential bugs caused by type coercion.
Basic implementation
-
Create a new file called
strict-equality.js. -
Define the rule by providing a type, description, and
createfunction to implement our logic.module.exports = { meta: { type: "problem", docs: { description: "Enforce the use of strict equality.", category: "Best Practices", }, }, create: context => ({ //Implementation logic. }), }; -
Now we need to figure out the visitor node we need. This is where you can use AST Explorer. Let us consider the below example:
if (a == b) {
  //Do something
}
We can see that the AST notation for the same looks something like this:
{
  "type": "Program",
  "body": [
    {
      "type": "IfStatement",
      "test": {
        "type": "BinaryExpression",
        "operator": "==",
        "left": {
          "type": "Identifier",
          "name": "a"
        },
        "right": {
          "type": "Identifier",
          "name": "b"
        }
      },
      // Remaining attributes
    }
  ]
}
From this, it is evident that the node we are interested in has the type
BinaryExpression. All we have to check is whether theoperatorfor this node is "==" and then throw an error for that particular node. -
Let us write this logic into our
createfunction, and report the error with a suitable message:create: context => ({ BinaryExpression(node) { if (node.operator !== "==") return; context.report({ node, message: "Use strict equality instead of loose equality.", }); }, }),
Implementing automatic fix
Right now, all our rule does is detect any loose equalities and show the error
message for that line. Let us add some logic to provide an automatic fix for the
detected errors. To achieve this, include the fix attribute in the
context.report() method. We can create a string representing the corrected
code and utilize the replaceText function provided by the context.fixer
object to replace the specific node with the modified string. To know about
all such functions offered by the fixer object, please check this
documentation,
on applying fixes.
Now, we need to create a string to replace the node with. Inspect this portion of the AST we generated earlier:
"type": "BinaryExpression",
"operator": "==",
"left": {
  "type": "Identifier",
  "name": "a"
},
"right": {
  "type": "Identifier",
  "name": "b"
}
The LHS and RHS of the operands can be accessed as, node.left and node.right
respectively. The value of these operands can be fetched from the name
attribute and our fix string can be constructed like this:
`${node.left.name} === ${node.right.name}`;
Hence adding this logic to our rule:
module.exports = {
  meta: {
    // Other properties
    fixable: "code", // Include this, when your rule provides a fix.
  },
  create: context => ({
    BinaryExpression(node) {
      if (node.operator !== "==") return;

      context.report({
        node,
        message: "Use strict equality instead of loose equality.",
        fix: fixer => fixer.replaceText(
          node,
          `${node.left.name} === ${node.right.name}`
        );
      });
    },
  }),
};
But, what if the LHS or RHS contains expressions, like these:
if(array[index].type == a)
In that case, node.left will have more nested nodes:
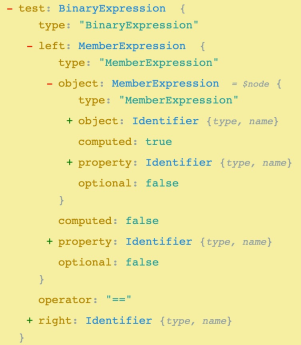
Now, we can't just proceed by using node.left.name. So, how do we make sure
that we don't lose any data? The getSourceCode() function is a utility
provided by ESLint that allows you to retrieve the source code corresponding to
a specific node in the context. We can obtain the source code as a string by
using getText() function on the node. So for the above example, we can write:
context.getSourceCode().getText(node.left); // Returns `array[index].type`
Now, let us modify our create function to handle this edge case and our
completed rule would look like this:
module.exports = {
  meta: {
    type: "problem",
    docs: {
      description: "Enforce the use of strict equality.",
      category: "Best Practices",
    },
    fixable: "code",
  },
  create: context => ({
    BinaryExpression(node) {
      if (node.operator !== "==") return;

      context.report({
        node,
        message: "Use strict equality instead of loose equality.",
        fix: fixer => {
          const leftNode = context.getSourceCode().getText(node.left);
          const rightNode = context.getSourceCode().getText(node.right);

          return fixer.replaceText(node, `${leftNode} === ${rightNode}`);
        },
      });
    },
  }),
};
Adding tests for the rule
In our earlier sections, you saw how to write tests for your custom rule. Now,
let us implement the same for our strict-quality rule. We need to add valid
and invalid cases as strings to the respective arrays. Inside, the invalid
array, you can make use of the output attribute to provide the expected fixed
code for that particular invalid case. So our tests will look like this:
const { RuleTester } = require("eslint");

const rule = require("../rules/strict-equality");

const ruleTester = new RuleTester({
  parserOptions: {
    ecmaFeatures: { jsx: true },
    ecmaVersion: 2020,
    sourceType: "module",
  },
});

const message = "Use strict equality instead of loose equality.";

ruleTester.run("strict-equality", rule, {
  valid: [
    "if (a === b) {}",
    "if (a === b) alert(1)",
    "if (a === b) { alert(1) }",
  ],
  invalid: [
    {
      code: "if (a == b) {}",
      errors: [{ message }],
      output: "if (a === b) {}",
    },
    {
      code: "if (getUserRole(user) == Roles.DEFAULT) grantAccess(user);",
      errors: [{ message }],
      output: "if (getUserRole(user) === Roles.DEFAULT) grantAccess(user);",
    },
  ],
});

console.log("Completed all tests for strict-equality rule");
Custom ESLint plugins
In real-world scenarios, we will have multiple custom rules and configurations
that we want to enforce consistently across our projects. This is where custom
ESLint plugins become invaluable, as they allow us to bundle and package all
these elements into a single plugin. In the Neeto ecosystem, we use our custom
plugin, eslint-plugin-neeto, to maintain a uniformly structured codebase.
In this section, we will create a custom ESLint plugin for the custom rules we created, and learn how to integrate it into our projects.
Getting started with a custom plugin
-
Create a new directory and initialize a new npm package for your plugin. The package name should always follow the naming format,
eslint-plugin-*:mkdir eslint-plugin-custom cd eslint-plugin-custom npm init -y -
Arrange our previously defined rules and tests in this folder structure:
eslint-plugin-custom ├── package.json ├── index.js ├── src │ └── rules │ └── no-var.js │ └── strict-equality.js │ └── tests │ └── index.js │ └── no-var.js │ └── strict-equality.js └── README.md -
Let us add ESLint as a devDependency in our plugin.
npm install -D eslint
Adding and exporting custom rules
Copy the rules we created into no-var.js and strict-equality.js. Now, how do
we help the plugin find our rules? You can add the following to index.js in
the plugin's root directory:
module.exports = {
  rules: {
    "no-var": require("./src/rules/no-var"),
    "strict-equality": require("./src/rules/strict-equality"),
  },
};
By configuring the index file in this way, you ensure that ESLint recognizes and associates your custom rule with the specified name, making it accessible in ESLint configurations.
Adding test files
In a similar manner to how rules are handled, we can establish a unified entry
point for our tests in src/tests/index.js:
require("./no-var.js");
require("./strict-equality.js");
You can either set up any test framework of your choice to run the tests or run them directly using:
node src/tests
Explore the complete code for the custom plugin, containing both the rules and their corresponding tests that we have developed this far, in eslint-plugin-custom.
Integrating the custom plugin
You saw in earlier sections that, it is possible to test your rules using
RuleTester. While this method helps you specify all the edge cases and test
your rules against them, it is not that easy, to think of all possible edge
cases. For this, we need to run our rules in real projects and we will have to
achieve this without publishing our package to the remote registry right away.
-
Integrate and test locally using yalc
Yalc acts as a very simple local repository for your locally developed packages that you want to share across your local environment. Let us see how we can use
yalcto test our custom plugin on host projects.-
Install
yalcglobally:npm install -g yalc -
Navigate to the root directory of your custom plugin and publish it to the local
yalcstore:cd eslint-plugin-custom yalc publish -
Navigate to the root directory of the host project. Add the custom plugin using
yalc:cd my-host-project yalc add eslint-plugin-custom -
Update your ESLint configuration in the host project to include the plugin and its rules in
.eslintrc.js:module.exports = { //Other configurations plugins: ["custom"], rules: { "custom/no-var": "error", "custom/strict-equality": "error", //Other rules }, };Here, we have excluded the prefix
eslint-plugin-, while specifying the plugin name and used only the wordcustom. ESLint automatically recognizes plugins without theeslint-plugin-prefix when specified in the configuration file. Trimming off this prefix is a common practice to simplify the plugin name and make it more user-friendly in the context of the host project.We also namespaced the rule under their respective plugins. By doing so, we ensure that ESLint can distinguish between conflicting rule names if any, and apply the correct rules based on your configuration.
-
Testing the custom plugin in the host project:
-
This can be done by running ESLint rules for a specific file:
npx eslint <file_path> #or to apply and test fixes npx eslint --fix <file_path> -
You can use a glob pattern, such as
**/*.js, to run ESLint on the entire project by specifying the file path pattern that matches the desired files to be linted:npx eslint "./app/javascript/src/**/*.{js,jsx,json}" -
You can integrate ESLint to VSCode by installing the ESLint extension. Once installed, to apply any changes made to ESLint configurations, simply restart the ESLint server, by opening the Command Palette (
Ctrl+Shift+PorCmd+Shift+P) and search for "ESLint: Restart ESLint Server". This will help you see red squiggly lines under the code containing the error. It is a good visual representation of our ESLint rule.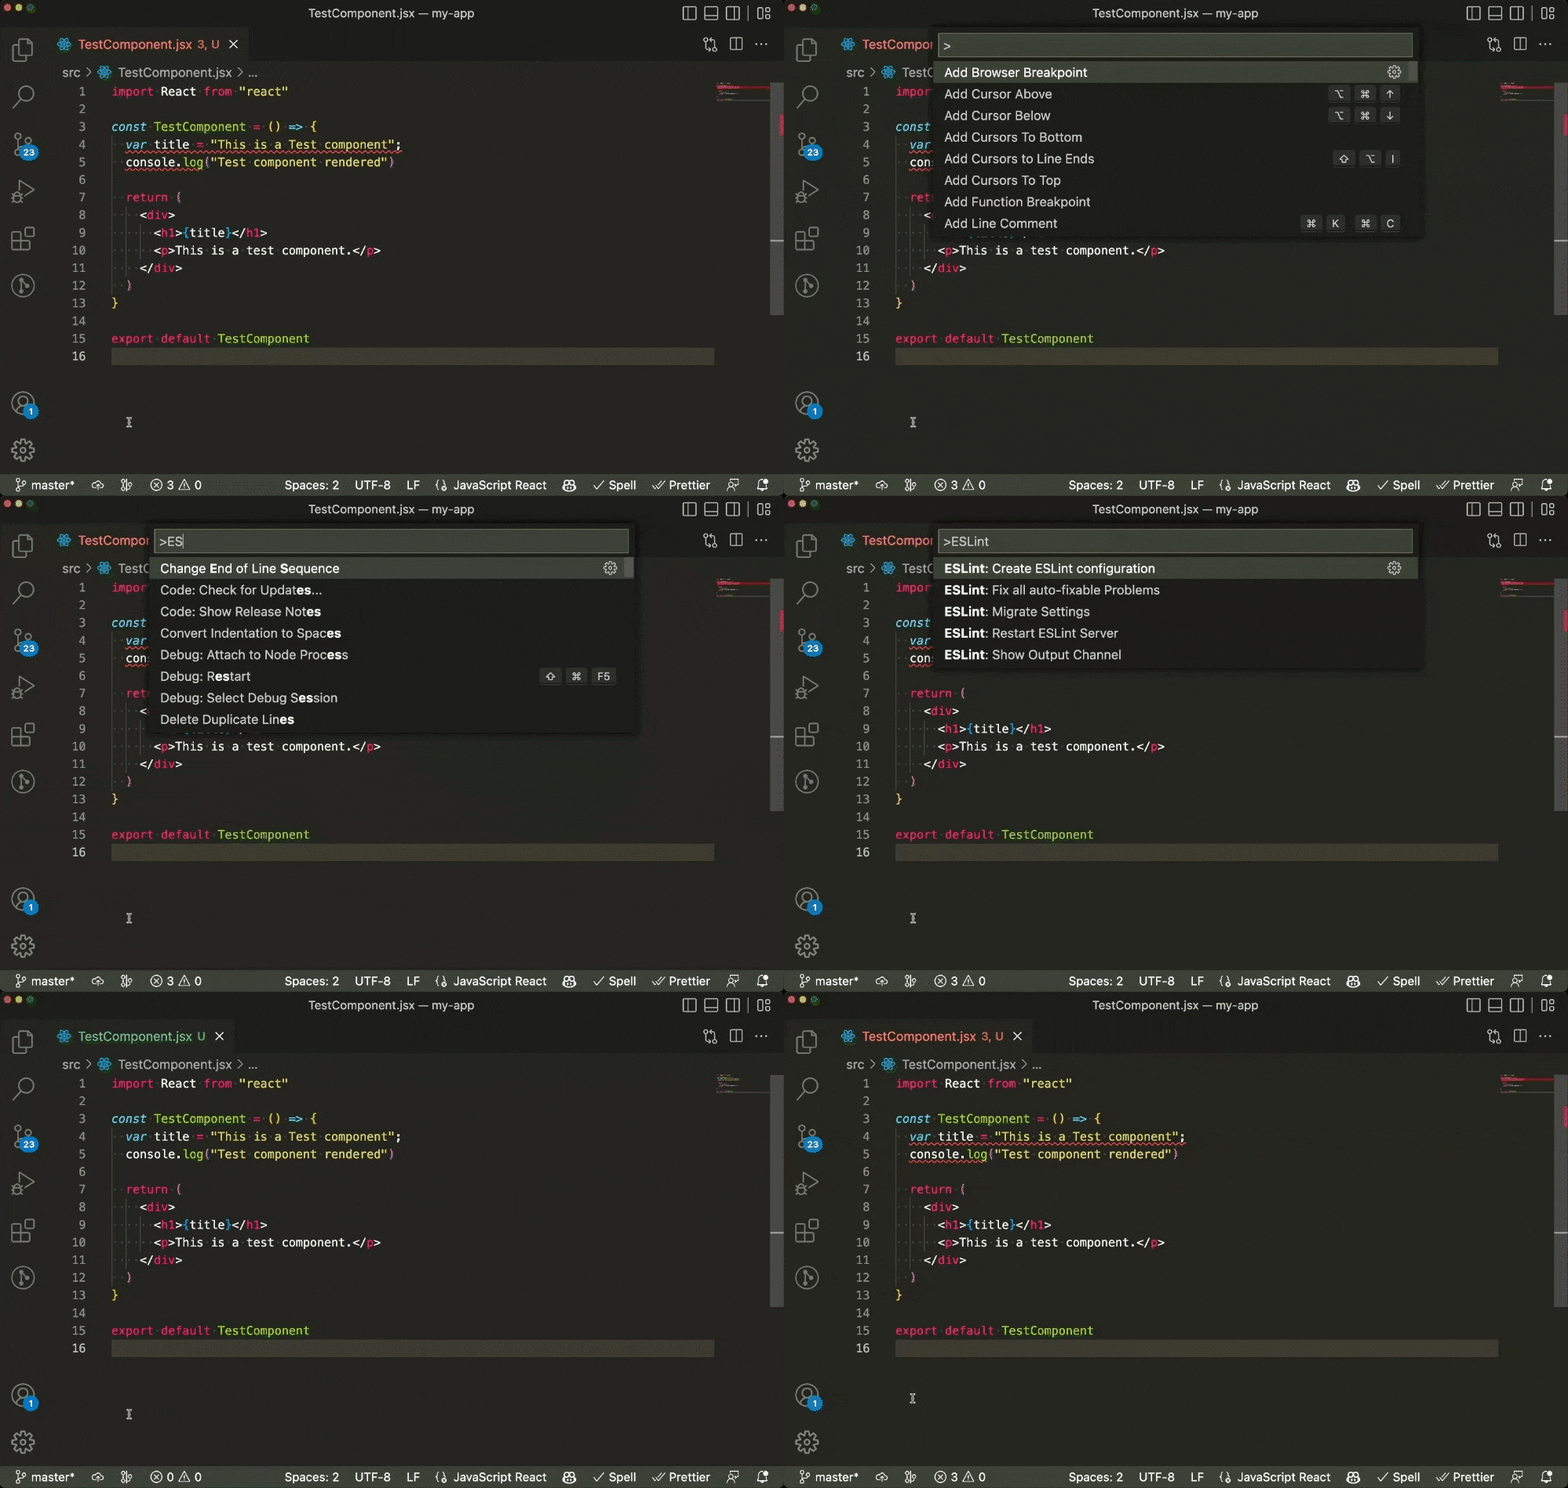
Do not forget to note down any edge cases you come across, so that you can refactor your rule's logic to cover those cases.
-
-
Every time you make a change in your plugin, you can push those changes to your host projects by running the following command from your ESLint plugin's root directory:
yalc push -
Once you are done with testing your plugin locally, remove it from the
package.jsonof your host project by running the following command from your host project's root directory:yalc remove eslint-plugin-custom
-
-
Integrating published plugin package
Once you publish the plugin into the remote registry, you can integrate it into your host projects.
-
Add the custom plugin as a devDependency to your project using the command:
yarn add -D "eslint-plugin-custom" -
Configure ESLint to enable your custom rules. We have already added the necessary configurations in step 6, of integrating using
yalc.
-
Adding a recommended configuration
When dealing with multiple host projects, it becomes a repetitive task to include the same rules and error levels in each project. Any updates or adjustments to these rules would then need to be applied across all projects individually. To streamline this process, the recommended configuration lets us keep all those configs within the ESLint plugin itself. This way, we can easily maintain and modify the rules without the need for duplicating efforts in every project.
Imagine we want to recommend using our current rules as warnings. In that case,
we can add a recommended config in our eslint-plugin-custom's index.js:
module.exports = {
  rules: {
    "no-var": require("./src/rules/no-var"),
    "strict-equality": require("./src/rules/strict-equality"),
  },
  configs: {
    recommended: {
      rules: {
        "custom/no-var": "warn",
        "custom/strict-equality": "warn",
      },
    },
  },
};
In the host project, where you want to use your custom plugin, you can install
the plugin and configure ESLint to extend the recommended configuration in
.eslintrc.js:
{
  "extends": [
    "eslint:recommended",
    "plugin:custom/recommended"
  ],
  // Other ESLint configurations for your project.
  "rules": {
    // Other project-specific rules.
  }
}
General tips on using ESLint
In this section, we will explore some general tips and tricks that will empower you to navigate through false positives, troubleshoot common pitfalls, and handle ESLint warnings well.
Handling false positives
Sometimes, ESLint can be overzealous and flag code as incorrect even when it's acceptable. Alternatively, there may be instances where we intentionally choose to adopt a particular coding style and wish to prevent ESLint from throwing errors. Here are a couple of strategies to address these errors:
-
Disabling ESLint rules:
You can temporarily disable the rule responsible for the false alarm by adding a comment above the code, like this:
// eslint-disable-next-line <rule_name>Example:
// Reason for disabling the rule.
// eslint-disable-next-line no-console
console.log("All tests were executed");
Do not forget to specify the reason why you have disabled that particular rule for that line, to avoid any future confusion.
-
Altering configuration:
ESLint provides an option to configure a rule as per your needs. Some rules accept additional options to customize its behavior. An example is, camelcase. It enforces the use of camel case for variable names. It accepts options to disable enforcing camel casing for specific cases. In a case where, you want to use a different naming convention, such as snake case, for object keys, you can set the
propertiesoption tonever:// .eslintrc { "rules": { "camelcase": ["error", { "properties": "never" }] } }This configuration tells ESLint to exclude properties (object keys) from the camel case requirement.
We can accept options in our custom rules and access them inside our rules via
context.options. Then, you can perform the necessary logic to handle such cases.
Common reasons for ESLint checks to crash
While using ESLint, you might encounter situations where ESLint checks crash or fail unexpectedly. Keep these in mind to avoid such crashes:
-
If you update or switch ESLint configurations, make sure to run
yarn installornpm installto install any missing dependencies. -
Ensure that your ESLint configuration has accurate parser options, like the language version and ECMAScript features, as they are crucial for ESLint to parse and analyze your code correctly.
Should we consider ESLint warnings?
As we've seen in previous sections, ESLint allows us not only to report errors but also to show warnings. When creating a rule, it may not always be possible to cover every edge case and eliminate all false positives. In such situations, we can configure these rules as warnings instead. Additionally, there are cases where we don't want to enforce a specific coding style but rather suggest a more optimized approach to the developer. In such scenarios as well, we avoid throwing errors.
While ESLint warnings don't necessarily require disabling through comments, it's recommended to review and address them whenever feasible. This practice improves code quality, helps prevent future errors, and enhances the overall robustness of the codebase. However, if you find that the suggestion does not apply to your specific situation, you have the flexibility to disregard it or disable it by including a comment.
Conclusion
Throughout this blog, we explored various aspects of ESLint, including understanding its purpose and benefits, configuring rules on a project, writing custom rules and plugins, and testing them effectively. We also discussed general tips for using ESLint, such as handling false positive errors, dealing with crashes, and considering warnings.
Remember to periodically review and update your ESLint configurations as your project evolves, and stay up-to-date with the latest ESLint releases and rule updates to take advantage of new features and improvements. To know more about functionalities of ESLint, you can refer the ESLint documentation.
Follow @bigbinary on X. Check out our full blog archive.