Introduction to custom Babel plugins

September 10, 2024
Babel is a tool that allows us to write modern JavaScript while ensuring it works across older browsers. Instead of generating binary code like traditional compilers, Babel performs source-to-source transformations.
For example, with modern JavaScript, we might use arrow functions like this:
const add = (a, b) => a + b;
This code works in modern browsers but not in older ones, like Internet Explorer, which does not support arrow functions. Without Babel, we would need to use older syntax to ensure compatibility, which limits our use of modern features. Babel solves this problem by transforming the modern code into an older syntax that more browsers can handle. For example, Babel converts the arrow function code above into the standard function syntax shown below, which is compatible with all browsers.
var add = function add(a, b) {
  return a + b;
};
With Babel, we can write modern JavaScript code without worrying about browser compatibility. Babel uses several presets and plugins to achieve this.
Plugins and Presets
Plugins are individual components that handle specific tasks in JavaScript code. For example, there are plugins for converting Arrow Functions to ES5 Functions, JSX to React functional calls and so on.
There are two main types of plugins:
-
Syntax Plugins: These plugins help Babel understand new syntax that it doesn’t recognize otherwise. For example, Babel doesn’t understand JSX syntax by default, so we need a plugin to enable this. @babel/plugin-syntax-jsx is a syntax plugin that allows Babel to recognize and parse JSX syntax.
-
Transformation Plugins: This type of plugins help Babel convert code written in modern syntax into format more widely supported by different browsers. For instance, @babel/plugin-transform-react-jsx is a transformation plugin that converts JSX into React functional calls.
Presets make things easier by bundling related plugins together. Instead of
setting up each plugin separately, we can use a preset that includes all the
necessary plugins. For instance,
@babel/preset-react includes both
@babel/plugin-syntax-jsx and @babel/plugin-transform-react-jsx, handling
both JSX recognition and transformation in one go.
Plugin and Preset Order in Babel Configuration
Babel processes plugins in the order they are listed in the Babel configuration file. This is important because the output of one plugin can affect the input of another. For example, if we want to convert JSX to React functional calls, we need to ensure that the JSX syntax is recognized first. So, we should list the syntax plugin before the transformation plugin in the configuration file.
{
  "plugins": ["@babel/plugin-syntax-jsx", "@babel/plugin-transform-react-jsx"]
}
Babel process presets in reverse order. This means that the last preset listed will be the first to be processed.
{
  "presets": ["@babel/preset-env", "@babel/preset-react"]
}
For example, let's look at the configuration mentioned above. In this case
@babel/preset-react preset will be applied first, followed by
@babel/preset-env, ensuring that React-specific transformations are handled
before general environment compatibility transformations.
Custom Babel Plugin
While Babel offers a wide range of plugins and presets, it's true potential lies in the ability to create custom plugins tailored to our project's specific needs. In the final section of this blog, we will explore a use case we encountered at Neeto and how we solved it with a custom Babel plugin. For now, let's focus on creating a simple plugin. Before we begin, it's important to understand a key concept called an AST (Abstract Syntax Tree).
Abstract Syntax Tree (AST)
An AST is a tree representation of the structure of a program. It breaks down the code into its constituent parts and represents them as nodes in a tree. Each node in the tree represents a different part of the code, such as a variable declaration, a function call, or a loop. Babel uses ASTs to analyze and transform JavaScript code. For example, consider the following code:
const sum = (x, y) => x + y;
This is how its AST looks:
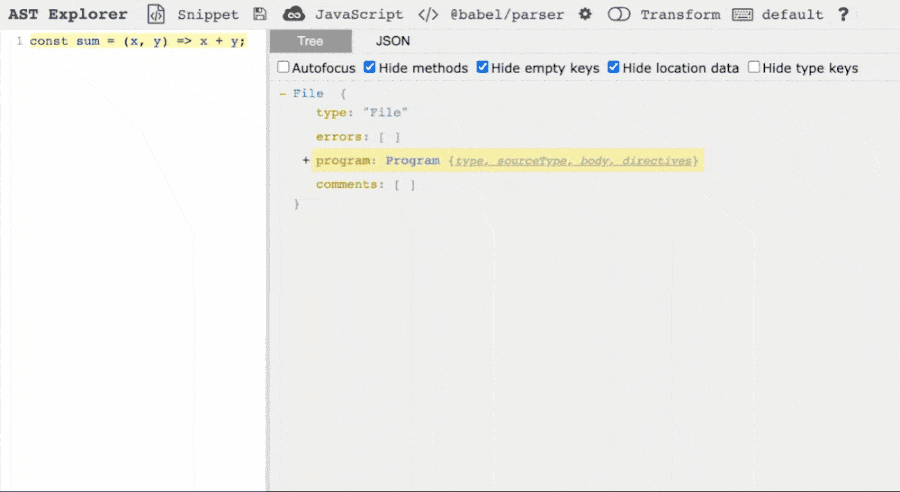
In this example, the root node is the File node, which represents the entire
code file. Within it, there are several nested nodes like, VariableDeclarator,
ArrowFunctionExpression and so on, each dedicated to different parts of the
code. As shown in the animation, hovering over each node highlights the
corresponding code segment on the left-hand side. To explore and interact with
both the code and its AST, the AST Explorer tool can
be used.
Babel transpile stages
Now that we have a basic understanding of ASTs, let's see at how Babel works. It has three main stages:
- Parse Stage: In this stage, the code that is passed to Babel as input is converted into an AST. This is done using the @babel/parser package.
- Transform Stage: This is the stage where Babel traverses and modifies the AST using @babel/traverse package. This is where plugins come into play to apply specific transformations. It’s important to note that this is the only step we can influence. In the next section, we'll see how to create a custom Babel plugin.
- Generate Stage: Once the AST has been modified, it needs to be converted back into code. This is done using @babel/generator package.
Creating a Babel Plugin
As mentioned in the previous section, Babel plugins are used to apply
transformations to the AST, and this is the only step we can influence. So,
let’s see how to create a simple Babel plugin. We will create a plugin that
converts all == operators in the code to ===. This is a common
transformation that developers often use to ensure strict equality checks in
their code.
First, let's set up the project structure for our plugin.
-
Step 1: Create a new directory and initialize a new npm package for the plugin. Let's prefix the package name with
babel-plugin-. This naming convention clearly indicates that the package is a Babel plugin, making it easier for others to identify its purpose.mkdir babel-plugin-strict-equality cd babel-plugin-strict-equality npm init -y -
Step 2: Create a file named
index.jsin the root of the plugin directory. This file will contain the logic for the plugin.touch index.js
Now that we have set up the project structure, let's start writing the plugin code.
To transform the code, we need to traverse the AST generated from the parse
stage. We can do this by creating a visitor object that defines the
transformations to be applied to the AST. The visitor object contains methods
that correspond to different types of nodes in the AST. When Babel encounters a
node of a particular type, it calls the corresponding method in the visitor
object to apply the transformation.
To understand this better, let's look at a code example that we want to transform:
a == b;
We want to transform this code into:
a === b;
First, let's examine the AST representation of the original code:
{
  "type": "File",
  "program": {
    "type": "Program",
    "body": [
      {
        "type": "ExpressionStatement",
        "expression": {
          "type": "BinaryExpression",
          "left": {
            "type": "Identifier",
            "name": "a"
          },
          "operator": "==",
          "right": {
            "type": "Identifier",
            "name": "b"
          }
        }
      }
    ]
  }
}
Here, our goal is to modify the BinaryExpression node with the operator ==
to ===. To achieve this, we need to create a visitor method for the
BinaryExpression. When Babel encounters a BinaryExpression node with the
operator == in the AST, it will call our visitor method to apply the
transformation.
So, let's write the code for our plugin. Open the index.js file we created
earlier and add the following code:
module.exports = function () {
  return {
    visitor: {
      BinaryExpression(path) {
        if (path.node.operator === "==") {
          path.node.operator = "===";
        }
      },
    },
  };
};
This plugin will traverse the AST, identify BinaryExpression nodes with the
== operator, and replace them with ===, ensuring strict equality checks are
used throughout the code.
Now that we have written the plugin code, let's see how to test it.
Adding tests for the plugin
To ensure that our plugin works as expected, we need to write tests. For this,
we can use the
babel-plugin-tester and
jest packages.
babel-plugin-tester is a utility that makes it easy to test Babel plugins,
while jest is a popular testing framework for JavaScript. Let's see how we can
add tests for our plugin.
-
Step 1: Install the required packages:
yarn add --dev babel-plugin-tester jest -
Step 2: Create a folder named
testsin the project directory. Inside this folder, create a test file namedstrict-equality.spec.jswith the following content:const pluginTester = require("babel-plugin-tester"); const plugin = require("../index"); pluginTester({ plugin, tests: { "should convert == to ===": { code: "a == b;", output: "a === b;", }, "should not modify == inside a string or comment": { code: ` const str = "a == b"; // comparison: a == b `, output: ` const str = "a == b"; // comparison: a == b `, }, }, });In the code above, we are passing an object to the
pluginTesterfunction with two keys:pluginandtests. Thepluginkey specifies the Babel plugin we want to test, while thetestskey contains an object defining our test cases. Each test case includes acodekey with the input code and anoutputkey with the expected result after the plugin is applied. ThepluginTesterfunction runs each test case, comparing the actual output with the expected output. If they match, the test passes; if they don’t, it fails. -
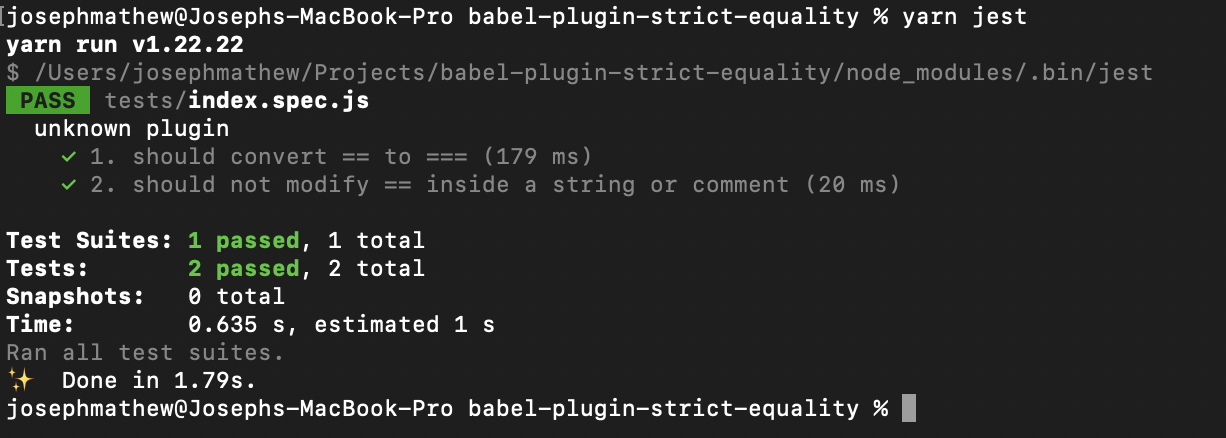
Step 3: Now to run the tests, use the following command:
yarn jestThis will run the tests and display the results in the terminal. If the test passes, it means our plugin is working as expected.
Testing the plugin in a real project using yalc
While pluginTester helps cover many edge cases, it’s challenging to anticipate
all possible scenarios. For this, we need to run our rules in real projects and
we will have to achieve this without publishing our package to the remote
registry right away.
To achieve this, we can use the yalc
package. yalc is a tool that allows us to work on the npm packages as if they
were published, but without actually publishing them. It creates a symlink to
our local package in the global npm registry, allowing us to install and use it
in other projects. Let's see how we can use yalc to test our plugin.
-
Step 1: Install
yalcglobally.yarn global add yalc -
Step 2: Publish the plugin using
yalcby running the following command in the plugin directory.yalc publishThis creates a symlink to the local package in the global npm registry.
-
Step 3: Install the plugin in the project using
yalcby running the following command in the project directory.yalc add babel-plugin-strict-equalityThis will add the plugin to the project as if it were installed from npm registry.
-
Step 4: Include the plugin in the Babel configuration.
{
  "plugins": ["babel-plugin-strict-equality"]
}
After testing the plugin in a real project and being satisfied with the results, it can be published to the npm registry.
Creating a Babel preset
If we have multiple plugins that we want to bundle together, we can create a
Babel preset. As mentioned earlier, presets make it easier to configure Babel by
bundling related plugins together. Here is an example of how we can create a
Babel preset that includes the babel-plugin-strict-equality plugin:
-
Step 1: Create a new directory for the preset and initialize a new npm package for the preset. Let's prefix the package name with
babel-preset-to indicate that it is a Babel preset.mkdir babel-preset-strict-equality cd babel-preset-strict-equality npm init -y -
Step 2: Create a folder named
pluginsin the root of the preset directory. This folder will contain the plugins that we want to include in the preset. In our case, we have only one plugin, so create a file namedstrict-equality.jsinside thepluginsfolder and add our plugin code to it.module.exports = function () { return { visitor: { BinaryExpression(path) { if (path.node.operator === "==") { path.node.operator = "==="; } }, }, }; }; -
Step 3: Create a file named
index.jsin the root of the preset directory. This file will contain the logic for bundling the plugins together.const strictEquality = require("./plugins/strict-equality.js"); module.exports = function () { return { plugins: [strictEquality], }; };Here we are returning an object with a
pluginskey that contains an array of plugins to be included in the preset. If there are multiple plugins, we can list them all in this array. We can now publish this preset to the npm registry and use it in our Babel configuration. -
Step 4: To use the preset in the Babel configuration, include it like this:
{
  "presets": ["babel-preset-strict-equality"]
}
Here we have created a simple Babel plugin and preset. This is just the tip of the iceberg when it comes to creating custom Babel plugins. We can create plugins to handle a wide range of tasks, from optimizing code to adding new features. To know more about the functions and methods available in Babel, you can refer to the Babel handbook. In the next section, we will see the use case we encountered at Neeto and how we solved it using a custom Babel plugin.
Motivation behind babel-preset-neeto
At Neeto, we build our own custom plugins and presets to streamline and simplify our development workflow. Let's look into one of the specific plugins we've designed and implemented and see how it enhances our development process.
We use Zustand for global state management.
Zustand provides shallow function, which allows us to construct a single
object with multiple state-picks inside. This helps prevent unnecessary
re-renders by using shallow equality to check if the selected state values have
changed. Let's consider the following example:
import { shallow } from "zustand/shallow";

const { id, name } = useSessionStore(
  store => ({
    id: store[sessionId]?.user.id,
    name: store[sessionId]?.user.name,
  }),
  shallow
);
In this example, the component only re-renders if id or name changes. If any
other state in the store changes, the component will not re-render. This
significantly improves performance. To know how this works, you can refer to
this
blog post.
However, when dealing with many state selections, the code can become verbose
and repetitive. For example, consider the following code:
import { shallow } from "zustand/shallow";

const {
  id,
  name,
  email,
  notifications,
  theme,
  language,
  isAuthenticated,
  apiToken,
  appVersion,
  darkModeEnabled,
} = useSessionStore(
  store => ({
    id: store[sessionId]?.user.id,
    name: store[sessionId]?.user.name,
    email: store[sessionId]?.user.email,
    notifications: store[sessionId]?.user.notifications,
    theme: store[sessionId]?.user.theme,
    language: store[sessionId]?.user.language,
    isAuthenticated: store[sessionId]?.user.isAuthenticated,
    apiToken: store[sessionId]?.user.apiToken,
    appVersion: store[sessionId]?.user.appVersion,
    darkModeEnabled: store[sessionId]?.user.darkModeEnabled,
  }),
  shallow
);
This is really repetitive, for each state, we need to add a line on left and right side of the code. Then we thought, what if we can infer the right side from the left side of the code. This will make the code more readable and less error-prone. But this is not possible with the custom functions or hooks because they operate at runtime and cannot modify the structure of the code during transpilation. This is where custom Babel plugins come into play. We have built a Zustand pick transformer capable of generating the boilerplate at the time of transpiling the code.
If this plugin is added to the babel configuration, we can rewrite the previous example as:
const {
  id,
  name,
  email,
  notifications,
  theme,
  language,
  isAuthenticated,
  apiToken,
  appVersion,
  darkModeEnabled,
} = useSessionStore.pick([sessionId, "user"]);
The array inside pick() is the path of the nested object to be accessed. You
might also notice that we don't have the
import { shallow } from "zustand/shallow" statement in this piece of code. We
don't need that. The plugin will automatically add it for us at the time of
transpiling.
The plugin detects that id, name, email, and other properties are to be
accessed from the store[sessionId].user in useSessionStore, and it generates
code for it. It will also add optional chaining for all the nested properties
automatically to make the picks free from null-pointer errors.
For more information about the plugin, refer to the documentation. To see the implementation of the plugin, check the source code
We've open-sourced this preset package so that it's accessible for use in your projects as well. To include this preset, install it using the following command:
yarn add -D @bigbinary/babel-preset-neeto
And then include it in the Babel configuration:
{
  "presets": ["@bigbinary/neeto"]
}
Follow @bigbinary on X. Check out our full blog archive.