Opening non HTTPS sites in WebView in React Native
July 27, 2016
Using WebView in a React Native application allows us to reuse already built web pages.
With iOS 9 or higher if our application attempts to connect to any HTTP server that doesn't support the latest SSL technology (TLSv1.2), WebView will fail and will not be able load the web pages.
Let's see this in action. Here we are trying to access a HTTP site via WebView in React Native.
<WebView style={styles.container} source={{ uri: "http://del.icio.us" }} />
Running that on an iPhone simulator with iOS version 9.0 or greater would show following error.
Error Loading Page
Domain: NSURLErrorDomain
Error Code: -1022
Description: The resource could not be loaded because
the App Transport Security policy requires the use of a
secure connection
Ideally, the site we are trying to connect to should have HTTPS enabled. However there might be cases where we need to connect to sites where HTTPS is not enabled.
For example, while developing the app, we might want to connect to local server which is running just HTTP.
Fix - Using Xcode
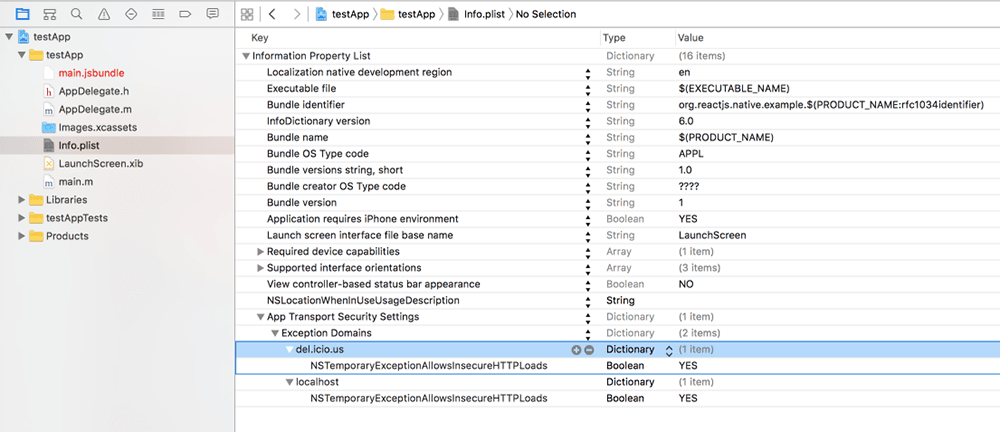
To access HTTP sites inside our WebView, we need to open the project in Xcode
and open the Info.plist file.
In the list of keys, we will find App Transport Security Settings.
When we expand the section, we would find localhost inside the
Exception Domains and the key NSTemporaryExceptionAllowsInsecureHTTPLoads
with value true.
Because of this setting when we are connecting to localhost then app runs even if server is running on HTTP and not on HTTPS.

So in order to make our non HTTPS site run, we need to add our website url to this whitelisting.
When we hover over the Exception Domains key, we would see a + sign at the
right hand side.
Click on it and add our domain here. Set the type to dictionary.
Now click on the domain we just entered and add
NSTemporaryExceptionAllowsInsecureHTTPLoads with type Boolean and value
YES similar to the one present for localhost

Re-run the app using react-native run-ios from the terminal and now the site
would be loaded.
If it doesn't work, then prior to running the app, do a clean build from xcode.
Fix using any IDE
By making the changes from XCode, if we look at the changes in info.plist file, we would find a few lines of code added.
So if we don't want to open Xcode for the fix, we can add the following lines directly in our info.plist.
Edit the node for the key NSAppTransportSecurity so that the whole node now
looks like this:
<key>NSAppTransportSecurity</key>
<dict>
    <key>NSExceptionDomains</key>
    <dict>
        <key>del.icio.us</key>
        <dict>
            <key>NSTemporaryExceptionAllowsInsecureHTTPLoads</key>
            <true/>
        </dict>
        <key>localhost</key>
        <dict>
            <key>NSTemporaryExceptionAllowsInsecureHTTPLoads</key>
            <true/>
        </dict>
    </dict>
</dict>
Be sure to re-run the app using react-native run-ios. Now let's see how to
allow all the HTTP sites instead of whitelisting each and everyone
Using Xcode
Using Xcode : To allow all the non HTTPS sites, just delete the
Exception Domains from Xcode inside info.plist and add a new key
Allow Arbitrary Loads with the value true.
Using any IDE
Our NSAppTransportSecurity should just contain the following.
<key>NSAppTransportSecurity</key>
<dict>
    <key>NSAllowsArbitraryLoads</key>
    <true/>
</dict>
Follow @bigbinary on X. Check out our full blog archive.